Tuesday, March 15, 2016

Disassembling

Today I started with welding the upper part of the door post. A few small holes which seemed to be made with a chisel while renewing the quarter panel.
It didn't take much time to finish this.
 So next I started with the disassembling of the rear of the car.
 Removing the trim for the convertible top.
Removing the lights and some electric pats.
 Dismounting the Trunk, rear bumper and a lot of other parts.

Monday, March 14, 2016

Door Posts

Today I started with the Door Posts.
First I removed the Bondo with a old screwdriver.

 Then I used a grinder with a wire brush fitted to remove the paint. The seem  of the rear fender to the door post was flush It seemed that there was also bondo applied to fill the gap. So I removed it.
And I found some holes that were covered. Only on the passenger side.
 Below you can see the Drive side after removing the paint.
 Then with a grinder and a chisel I removed The bad part. To get access to the panel below I had to cut out a pice of the rear fender.
 After cleaning the area I started with cutting a piece of metal to fit in the hole.
I tacked it in place and did so with the piece of the fender that was cut out. And the I finished welding it.
 Next I ground the welds flush.
 Then I did about the same with the bottom of the passenger side.
So tomorrow I will attack the upper of this door post.

Thursday, March 10, 2016

Finishing the front

Today I grounded the remaining welds flat. There are however some welds that need some grinding but I can not access them with a normal grinder.
Next week I shall bring my own grinder to do those xelds.

The next thing i did was drilling some holes for the fenders and some other holes that were cut away.

And that's it for the front of the car. it looks like the welding is done.
So next week I will work on the bottom of the car and grind all the welds. And the doorway's need some cutting and grinding.

Wednesday, March 9, 2016

Passenger side

Today I turned mu attention on the frame at the passenger side.
I started with drilling out some spot welds to be able to remove the side plate on the frame.
 Then the plate was removed and I got access to the rest of the frame.
The bottom was severely rusted and needs to be removed.
 Then the edges are grinded to remove the surface rust.
 A new section of frame was cut and fitted and welded in place.
 A new cover plate was made and welded in place. Then all welds are ground flush to give a nice result.


Tuesday, March 8, 2016

Welding and more.

Today I started with welding the frame .
Then I cut some more pieces, fitted everything and welded it in place.
So after a few hours this is the finished frame.


Tomorrow we will continue with the other side.

Monday, March 7, 2016

Frame repair.

Last week I cut out the rotted parts from the frame rail.

So Today I started with cutting, drilling bending and grinding to make some parts for the frame.
In the picture below the result. I also made a piece for the passenger side which will be addressed at a later time.
 So the next thing I did was to fit the new frame rail in place.
I had to cut some parts a way and after a while it fell right in to place.
The next thing I did was tacking it in place and then welding it in place.
For today I did some welds but the most part will be welded tomorrow.

Friday, March 4, 2016

How do I fix this.

Today I started with taking some measurements and a doodle.
The repair that needs to be done on the driver side is extensive.
 So I gave it a good thought and then started cutting and drilling all the bad parts away.
And this is what it is. A good portion of the frame is cut away. 
 Now we can start by making some new frame rail and fitting it in place and then welding it all together. And then start all over again on the passenger side.
The driver side is the worst.

Thursday, March 3, 2016

Repairing the front frame.

Today I started withe the repair of the rust in the frame and spring tower on the passenger side.
First I cleaned the part with a wire brush on a grinder.
 Then I started with drilling out the spot welds on the seem of the frame.
 With a cut off wheel I cut out a piece of the frame rail. This gave me access to the top of the frame.
 The rotted pieces were then cut out...
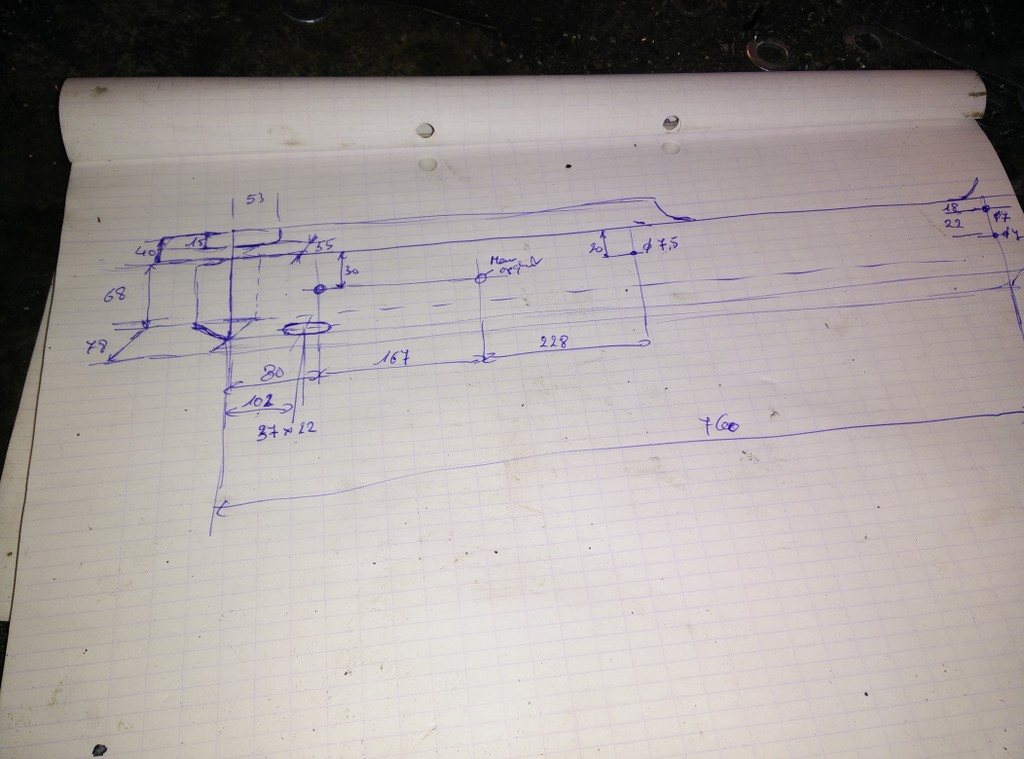
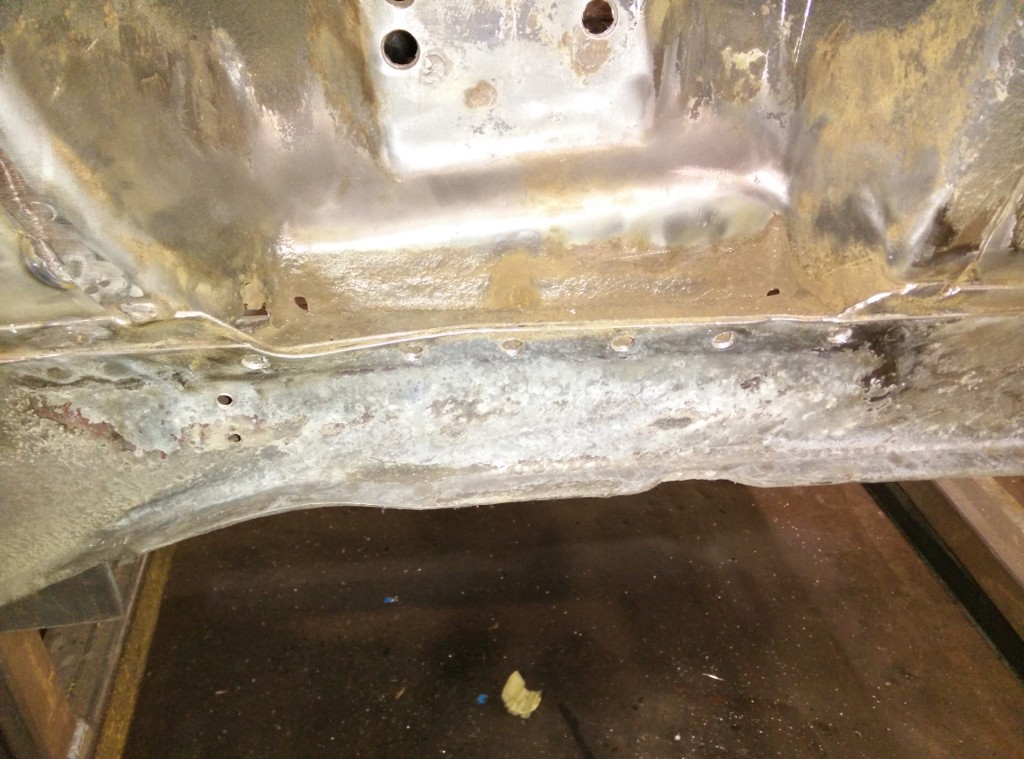
 And new pieces are cut out of a sheet of metal with a thickness of 2 mm. After bending, forming and cutting the pieces to fit I welded all the parts back in place.
 Then all welds are ground flush.
 Then I turned my attention to the front off the frame. On the inside of the engine bay near the front panel I noticed that there were some previous repairs. To be sure they are repaired like they should, I ground of the paint .
It was no surprise that they were not repaired like it should.  
 With a chisel I cut off the the pieces off metal that were tacked in place.  What I found, especially on the driver side I could never have imagined. The chassis was rotted from bottom to top.
 On the drivers side the bottom of the spring tower has been previously been repaired. A piece of metal was bent and tacked in place. After removing it I found one big hole.
 So I removed the front support that I put in place while repairing the floor. This gives me access to the under side off the frame.
 So next I drilled out some spot welds an started with cutting out the frame facing the fender.
Tomorrow I will continue this repair.

Wednesday, March 2, 2016

The cowl is in place.

Today I finished welding the cowl in place.

 So next I started fitting the connecting piece between the inner fender and cowl.
I drilled the necessary holes made a few extra bent to make it fit took some measurements and ...
 Welded it in place. But before that I ground all the spot welds flush on the cowl to allow a good fit of the connecting pieces.
 The pictures are taken on the driverside, the other side was also welded in place.
 And then I strted the finishing of the flare on the side of the cowl.
 A few cuts are made...
 And then the edges are bent up so the water can easily flow away.
 The same thing was done on the other side.

Tuesday, March 1, 2016

Installing the new cowl

Today I started with cleaning up the edge on which the cowl will be mounted ( welding).
Doing so I discovered a part in the firewall that is rusted trough.
So I cut it out.
 And a new piece of metal was welded back in place.
 The cowl exist of two parts. I started with welding together  since the top seem of the underside is connected before the window edge.
 After welding I drilled a lot of holes in theedges.
 Then the whole assembly was put on the car and hold in place with some vise grips, C-clamps and some bolts.
 After some wiggling around it fitted pretty well and I welded in place on the corners.
Tomorrow I will weld it completely in place.