Thursday, December 22, 2016

clutch cable

Today I had access to the lathe so I made a plastic bushing for the pedals.
They are now operating without play.
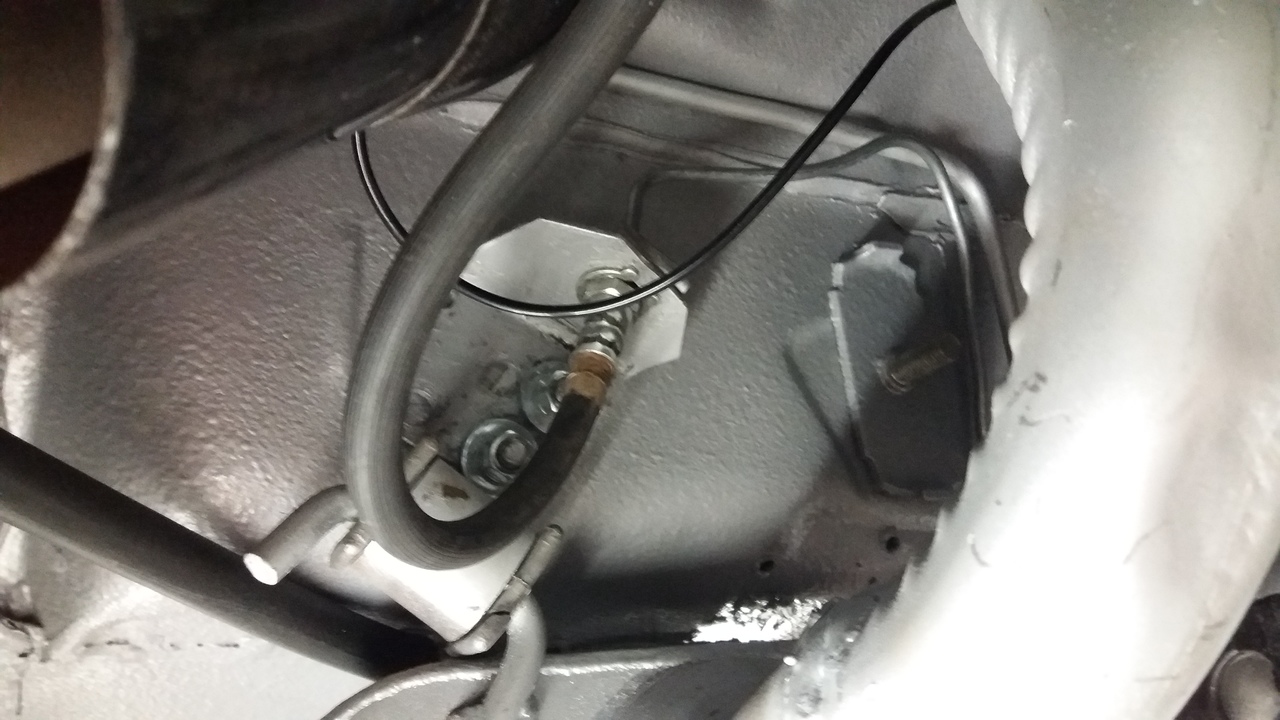
The brake pedal was already working but the rest not so I did take care of that. This meant that I had to connect the Clutch cable from the pedal to the clutch lever under the car. Getting that cable in place was a challenge. But finally I got there. Mounting the cable to the bell housing I noticed that the exhaust was mounted very tight against the bell housing and the location of the cable. Now I know why it was wrapped with some kind of heat insulator. The wires they used to hold it in place were replace with some hose clamps.
The picture below should clarify a lot.
 Now that I was under the car I also installed the reinforcement plate and connected the handbrake cable . For this i had to make a small bracket to hold the cable in place in the balancing lever.
  Next I made a small bushing to connect the accelerator pedal to its linkage.
 I also reinstalled the pedal covers which have been removed for painting the pedal assembly.
For now this means that the handbrake is working, same for the accelerator pedal and the clutch pedal.

Wednesday, December 21, 2016

Heater box

I started the day with securing the brake line to the firewall. The hand brake cable and the speedo cable are routed into the car. Next I started with the mounting of the pedals to the car but I had to stop. one bushing is missing. It's a small plastic bushing and I had no acces to the lathe today. So that 's one item on the list for tomorrow.
 So next I installed the heater box in the car.
 Following to that I installed the heater control panel and attached all the cables to the heater box. So this is the first piece that goes into the dashboard. More will follow later.
 The last Item I did today was installing the fresh air inlet under the dash. It was a hassle to get it in place.
This is it for today.

Tuesday, December 20, 2016

Master cylinder

First I tightened the screws of steering knuckle.
Then I installed the brake booster and then the master cylinder to it. Then I had to install the brake lines to the master cylinder. All this in a tight location under the hood.
 But finally I got it all tightened. Brake fluid will be for later.
So next I installed the handbrake lever and attached the cable.
Tomorrow we will continue the assembly.

Monday, December 19, 2016

Steering column

Today I started with the fabrication of a small square screw that was missing for the pedal bracket.
 I cut it from a piece of plate 6 mm thick then drilled and tapped it with 5/16" UNF and the put it where it needs to go.( see picture below).
 Then I installed the windshield wiper assembly to the car.
 Some fiddling was needed to get the blots in. But finally it is in.
 Then I started with the steering Column. I wrapped it with some soft paper so I don't scratch the surface. Then every thing was bolt to the car.
 And then I attached the steering joint to the column. The bolts need to be tightened and then we can proceed with the rest. But for now the steering column is attached to the steering house.

Thursday, December 15, 2016

Accelarator pedal

In order to install the Main brake pump I have to install several other things.
Windshield wiper mechanism, Steering column, Pedal assembly and several other parts.
All these parts have one thing in common, they are still dirty.
So I cleaned scrubbed and painted a lot of these parts.
 In this picture you can see the pedal assembly, and steering column retainer bracket all painted.
 In this picture you see the wiper motor being painted and the steering column.
The steering column was bare metal with a satined finish but it had traces of superficial  rust. That rust was removed with a wire wheel and some Scotch brite and then coated wit clear lacquer.

And then I installed the accelerator pedal. It was painted yesterday and that paint was dry.

Wednesday, December 14, 2016

Rear Brakeline

Today I installed the rear brake line.
It was quiet a hassle to get it in place. Especially the connection with the rear flexible hose. The bracket I installed did not corespondent with the brake line and positioned it to close to the exhaust.
 it now has a nice curve so it will clear the exhaust and it has enough travel for the suspension.
I also had to clean and paint some brackets to put the line in place.
Together with the fuel line they are now firmly in place.

Tuesday, December 13, 2016

Brake lines

Today the brake lines arrived from the US. So the first thing I did was to get them at the Mustang Garage.
 So you can guess what I did next. After I sorted out the different lines I started with the mounting of the front lines.
First I cleaned the little T block from where the front brake lines go to the front wheels. The car had to be jacked up again and the wheel had to com of ones more. Then after some searching I found out how the brake lines should run and mounted them in place.
 Then I Tried to fiddle the lines in the T connector. Mounted back the wheels and lowered the car back down.
No I need to find out how the lines are secured to the car. But that will be for tomorrow.

Monday, December 12, 2016

Back again

After a few weeks of absence I'm back again.
 I started with installing the splash guard on the inner fender at the left side. And then I put the car on its wheels again.
 Next I installed the new rear quarter window mechanism. Like you can see on the picture above there are 2 teeth missing. Causing a jamme of the mechanism from time to time.
 And next I installed the firewall insulation. It finally has arrived.
Now we can start with the assembly of the interior of the car.

Friday, November 25, 2016

The grill

Today I first installed the hinges on the fenders.
And then I bolted on the hood.
After some alignment the hood is laying pretty good so I continued with the next item. The grill.
 It took me some time to find all the bits and pieces but finally its coming together. And then I realized that I have forgotten something. The lock for the hood.
Trying to fiddle it in between the grill and radiator didn't work. So I had to take the grill of again and then back on after the lock has been installed.
Next I aligned the lock to the hood and it looks fine.
Except for the lights and bezel and bumper and some other small stuff the front is coming together nicely.

Wednesday, November 23, 2016

Installing seals

The pieces i glued in yesterday I did not touch yet.
I immediately started with the front suspension. Taking it apart to put new seals on the ball joints. They were damaged previously while taking the car apart.
 After taking it apart and putting the new seal in place I did reassemble it again Tightening the bolts down to spec and installing new cotter pins. so this front suspension is ready to roll again.
 I had some time left so I decided to install the front splash guards. These will keep moisture and grime front reaching the rear of the lights.
 I also applied some paint on the pieces I glued in yesterday.
 And then the splash guard on the other side was mounted.

Tuesday, November 22, 2016

Hood hinges part 2

The first thing I did today was to bring up the car to height and take off the wheels.
Then I set the car down on blocks.
 This gives me the opportunity to reach under the fender and to drill the hole for the nuts to a diameter of 16 mm.
 I also painted the parts made yesterday. Then I made some washers. Large washers with a hole of 27 mm. The inside was chamfered to give clearance for the recess on the back of the hinge nuts in the fender.
 Then with the help of some TEC 7 ( a polyurethane glue ) glued them to the inner fender.

 Next I took the bolt made yesterday added some Glue and put them through the hole in the fender .
 Then i added some more glue on the other side before mounting the nut I made yesterday and tightened everything down.
Now I leave it alone for more then 24 hours to let the glue fully cure.

Monday, November 21, 2016

Hood hinges

First I took the hood from the car.
And then I unscrewed the bolts from the hinges on the inner fender.
The ones on the driver side came right of. Only one bolt remained somewhat attached.

 I als did take off the nuts from the fender  on the other side. So now I have to come up with a way to mount the hinges again without welding new nuts to the inner fenders.
 And Suddenly I came up with this. These bolts nuts and washers are the solution to my problem.
 First I drilled a center hole in the head of the bolts.
 Then I drilled a hole through the bolt with a 6.5 mm drill bit.
 Then I screwed everything together a bolt and nut with a washer in between.
The washer was then welded to the nut.
 Then on the lathe the bolt with the nut mounted was turned down. So that the nut was shortened 2 mm.
 Then the whole lot is flipped around and the head of the bolt is turned down to a size of 2.5 mm. That is about the depth of the recess for the original nuts. They where spot welded with a very small spot welder so it seemed.
 Then the hole in the bolt is tapped with 5/16 unf treads.
 And then everything was coated with a primer.
Tomorrow we will continue.